1. If possible, shoot in the spring. Even if you’re planning to stay in your home until fall, don’t let spring pass you by without taking some good exterior photos of your property. New leaves on your trees and shrubs, flowers blooming in their beds and fresh, green grass offer much more curb appeal than snow drifts, sun-stressed turf or bare branches.
Exception: Planned improvements, like a new roof, concrete repairs or landscaping updates are probably worth waiting for.
2. Stage your property for the best photo. Home staging is just as important on your front lawn as it is in your living room—in fact, it can be more important! A little prep time on your home’s exterior may be the difference between a photo that sells and a photo that turns buyers away.
Put away toys, tools and other clutter. Don’t forget to stash the trash cans!
Park cars away from the house if they won’t fit in the garage.
Close the garage door and all other exterior windows and doors.
Sweep walkways and the driveway. Clean up oil spills on concrete.
Make sure your lawn and landscaping look their best.
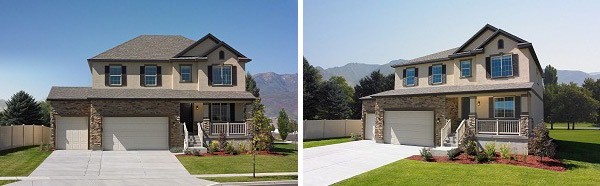
3. Choose the right time of day to take outdoor photography. The direction your home faces, the amount of shade it gets from trees or eaves, and even its paint color can make it hard to guess what time of day will give you the best shot. Thankfully, you don’t have to guess! Try taking a few test photos shortly after dawn, then at mid-morning, mid-afternoon and at twilight to see which is right for your home. Using a digital camera, all it will cost you is time.
Also, if you have the chance, experiment with cloudy and clear days. A slight overcast could cut down on glare, letting the details of your home pop—particularly if you have covered porches or lots of shade trees.
In general, remember:
Keep the sun at your back. If your home is backlit, everything will be lost in shadow.
Watch out for glare in windows and other shiny surfaces. If you see them, try changing the angle of your shot.
If you’re taking early morning or twilight photos, be sure to turn on all interior and exterior lighting. If you’re shooting in bright daylight, keep lights off so windows will be dark in contrast.
4. Frame the best shot. Odds are, a head-on view of your home will not be its most flattering angle. Porches lose their depth, driveways appear too wide and the viewer can’t get a feeling for how spacious the home is inside. Try shooting your house from each of the front corners of the property, and from various points between. You’ll probably find that an angle opposite the driveway gives you a better overall photo because it shows more grass, landscaping and house than garage and pavement.
Read More: http://www.richmondamerican.com/blog/capturing-curb-appeal-4-real-estate-photography-tips
Related Article: 10 Top Notch Link Building Tactics for Real Estate Websites
No comments:
Post a Comment